How to Die Less in Modern Warfare 2

January 20th, 2010

Since the day MW2 came out, it hasn’t left my XBox. However addicted to MW2, I am fairly average. I have been working on getting my kill ratio up to 1.0. I am currently at 0.89, up from about 0.6.

The best way to increase your kill ratio is to die less. And to die less, you need to figure out why you are dying. Here is how I was dying, and how I fixed the problem.

You die throwing a a grenade

Change your equipment from a throwable to claymore. Claymores seem to plant quicker and require no cooking. Plus the claymore persists through your current life, so it’s always active.

You die aiming

First of all, practice shooting from the hip. Close combat is best done from the hip since you can turn quicker.

Secondly, use the Sleight of Hand Pro perk. Your scope will raise much quicker.

If you run a lot, the Lightweight Perk allows you to transition from run to scope quicker.

You die because you are too slow

Use a smaller gun. Assault rifles and sub machine guns enable you to move quicker.

If you must use a machine gun, use Lightweight Perk.

For best results, enable Marathon and Lightweight.

You die becuase you cannot knife quick enough

When an enemy shows up from no where, you’ll need to knife them quick. Make sure that the knife is a quickly accessible button. I have mine the right stick click.

If you often miss, enable the Commando Perk to get more knifing range.

If you often miss and cannot recover, level up a pistol and add the tactical knife. This allows quicker recovery in case you need to knife twice.

You die from air assaults

Select a launcher as your secondary so you can shoot down planes and helicopters. Make sure to shoot them from a place with good cover otherwise they are likely to kill you first.

You can also select the Cold Blooded Perk to prevent air support from detecting you.

You die activating the UAV or some other perk

Remove your lower 3 & 4 kill streak rewards. This does two things:

  • Kill Streaks will not distract you until you’ve already racked up a decent amount of kills.
  • And, its adds to your incentive to attain those higher Kill Streaks.
  • Don’t use the Hardline perk.

You can accumulate multiple Kill Streaks and activate them in reverse order. So do not rush to use them. Wait until the action around you cools and you can get some cover.

When you activate the Kill Streaks, you are vulnerable. Make sure to find a safe place. Ideally, lay down in some brush.

You keep unused Kill Streaks even after you die.

You die calling in Care Packages

Finding a safe place goes double for the Care Package. Find a place out of sight from enemies. I prefer the map corners.

You can use Care Package as bait for enemies. Throw down a claymore near the Care Package or hide off to the side and pick off enemies as they try to steal the package. Stealing a Care Package takes several seconds.

You die becuase enemies can find you

Go into super stealth mode.

  • Use a silencer.
  • Use the Cold Blooded Perk.
  • Use the Ninja Perk.

Don’t use the Scrambler Perk. I find that it actually gives away your position.

I like to use the Bling Perk so I can enable the heartbeat sensor and the silencer at the same time. If you do this, make sure to choose a weapon with good iron sights.

You die because you run out of ammo too quick

This is a good problem, because it means that you are staying alive. Unless your aim really sucks, of course.

Enable the Scavenger Perk so you can lift ammo from dead players.

Pick a weapon with larger capacity. This usually means a machine gun. If you select this, enable the Lightweight and the Sleight of Hand perks for faster  reloading.

Disable the double fire rate.

You die because you are out of practice

Play Free for All. Everyone is an enemy so the game play is quicker. Its easier to rack up lots of kills and improve your kill ratio.

Shoot from the hip. Keep your finger off the aim button.

Video Games

TipSaver now in the iTunes App Store!

December 6th, 2009

My first iPhone & iPod Touch app is live in the App Store!

TipSaver is an expense tracking and reporting app. TipSaver totals expenses by day, week, and month. Flag expenses for a report in csv format.

In case you didn’t suspect, it can also calculate tips and splits.

Visit TipSaver at the App Store. $.99 for a limited time.

droppedimage_6

Uncategorized

iTunes 9 + Home Sharing + iPhone

September 10th, 2009

It looks like Apple has all the pieces necessary for over-the-air iPhone and iPod Touch syncing.

Mac , ,

FolderOrg — now works with Snow Leopard

August 31st, 2009

folderorg_sept05

The old version FolderOrg in Snow Leopard requires Rosetta PPC emulation. I rebuilt the script in Snow Leopard and Rosetta is no longer required. It also appears to run much faster.

Click here to download.

I have not tested this version on anything but Mac OS X 10.6.

Installing in Snow Leopard.

  1. Unzip FolderOrgXSnowLeopard.zip
  2. Copy FolderOrgX.app to ~/Library/Folder Action Scripts/
  3. Right-click on a folder that you want organized.
  4. Select Folder Action Setup…
  5. Select FolderOrgX from the action scripts

Configuring FolderOrg

To configure FolderOrg, double-click on the FolderOrgX.app icon. You will be prompted with three questions:

  • Do you want to show the folder when new items are added?
  • Do you want to activate the Finder when new items are added?
  • Do you want to change them modification date to the time items were added?

What is FolderOrg?

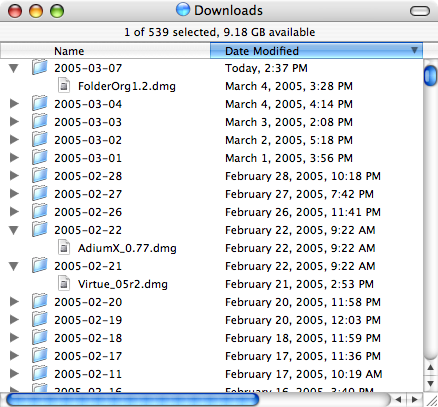
It organizes your Downloads folder, Desktop folder, or any other folder by grouping new items into a dated folder. It looks like this:

windowshot

FolderOrg will only organize newly added files; not pre-existing files.

Warranty

This software is freeware. Use at your own risk. FolderOrgX is unsupported, but I will respond to comments on this post as time permits. I have not tested this version on anything but Mac OS X 10.6.

Mac, My Software ,

ClickToFlash - performance benefits all around

July 27th, 2009

ClickToFlash is the best app to regain performance on your Mac, especially your MacBook.

You know when you visit just about any website and the MacBook fan kicks on, it runs slow, gets REALLY hot, and your battery quickly drains? Well, usually this is due to Flash embedded in an open web page somewhere.

I really thought my MacBook was slow and its battery was abysmal. Then I discovered & installed ClickToFlash and Flash no longer loads or executes without my permission. This increases page load speed, responsiveness, battery life. And it even upgrades YouTube videos to the hi-res version if available.

ClickToFlash is open source and Leopard and Snow Leopard compatible. It works with any app that uses WebKit such as Safari and NetNewsWire.

ClickToFlash

Rating: ★★★★★

Mac, Review , ,

Events and ExtJS

April 1st, 2009

I whipped up a small demo app to demonstrate how events work in an ExtJS app. The demo is simple. There is a tree panel on the left and a form panel on the right. When the user clicks a node in the tree, the form is updated with the name of the node.

Events are useful because the sender and receiver objects do not need to know about each other. Just what events they will send and respond to.

To use events, there are three things you’ll need:

  • Events - Events are fired when something happens, such as when a user clicks a node in the tree. Events are usually accompanied by some args for the listener. The object that sends an event can be called a sender.
  • Listeners - Listens for events and does something, such as update a form field or reload a data store. The object that listens for an event can be called a receiver.
  • relayEvents() - This is the “glue” that tell which objects will receive which events.
Events
MyTree (a TreePanel) is a sender that builds a simple tree with root and a couple nodes. Clicking on a node will fire a “nodeSelected” event along with the node name as an argument. The root node will fire the “rootSelected” event when it is clicked with no argments.
Here is MyTree code:
1
2
3
4
5
6
7
8
9
10
11
12
13
14
15
16
17
18
19
20
21
22
23
24
25
26
27
28
29
30
31
32
33
34
35
36
37
38
39
40
41
42
43
44
45
//  Tree Panel
MyTree = Ext.extend(Ext.tree.TreePanel, {
 
    region: 'west',
    width: 150,
    viewConfig: {
        forceFit: true
    },
    initComponent: function()
    {
        MyTree.superclass.initComponent.call(this);
        var root = new Ext.tree.TreeNode({
            allowDrop: false,
            text: "my root",
            expanded: true
        });
        root.on('click',
        function() {
            this.fireEvent('rootSelected');
        });
        this.setRootNode(root);
        var anode = new Ext.tree.TreeNode({
            allowDrop: false,
            text: "my node",
 
        });
        anode.on('click',
        function() {
            this.fireEvent('nodeSelected', anode.text);
        });
        root.appendChild(anode);
 
        var bnode = new Ext.tree.TreeNode({
            allowDrop: false,
            text: "another node",
 
        });
        bnode.on('click',
        function() {
            this.fireEvent('nodeSelected', bnode.text);
        });
        root.appendChild(bnode);
    }
 
});

Listeners

MyForm (a FormPanel) is a receiver that listens for events that have fired. Listeners are created by using the on() method or the addListener() method; they both do the same thing. These listeners should also expect the arguments that accompany fired events, if needed.

MyForm has two listeners, that correspond to the events fired by MyTree: “nodeSelected” and “rootSelected”. nodeSelected expects an argument, the node’s name, which is displayed in the form field. rootSelected does not need an argument; it just clears the form field.

1
2
3
4
5
6
7
8
9
10
11
12
13
14
15
16
17
18
19
20
21
22
23
24
25
26
27
28
29
30
31
32
33
34
35
36
37
38
39
40
41
42
43
44
45
46
47
48
// Form Panel
MyForm = Ext.extend(Ext.form.FormPanel, {
    region: 'center',
    title: "Sample Form",
    layout: 'fit',
    doSomething: function(a) {
        this.getForm().findField('node').setValue(a);
    },
    doSomethingElse: function() {
        this.getForm().findField('node').setValue('');
    },
    initComponent: function() {
        Ext.apply(this, {
            items: {
                xtype: 'fieldset',
                labelPad: 10,
                defaultType: 'textfield',
                labelAlign: 'right',
                items: [
                {
                    xtype: 'field',
                    id: 'node',
                    name: 'node',
                    fieldLabel: 'Selected Node',
                    labelSeparator: '',
                    width: 250,
                }
                ]
            }
 
        });
        MyForm.superclass.initComponent.call(this);
 
		//  Add a listener for nodeSelected event
        this.on('nodeSelected',
        function(a, b) {
			// call my method when nodeSelected event is fired
            this.doSomething(a)
        });
 
		//  Add a listener for rootSelected event
        this.on('rootSelected',
        function() {
			// call my method when rootSelected event is fired
            this.doSomethingElse()
        });
    }
});

relayEvents()

relayEvents() is the glue between the event sender and event receiver. It makes the receiver aware of the sender.

  • Create MyTree and MyForm panels.
1
2
3
//  Make panels
var tree = new MyTree();
var form = new MyForm();
  • Tell MyForm to listen for events from MyTree
1
2
3
// Tell form to watch for nodeSelected and rootSelected from tree
// THIS IS THE GLUE!
form.relayEvents(tree, ['nodeSelected', 'rootSelected']);
  • Layout MyTree and MyForm
1
2
3
4
5
6
7
8
9
//  Layout on screen
var viewport = new Ext.Viewport({
        layout:'border',
        items:
        [
            form,
            tree
        ],
    });

And that’s the most basic useful demonstration of using events with ExtJS.

Links

ExtJS, WebDev

iTerm with Genders

December 15th, 2008

I modified the latest iTerm 0.9.6 source to add support for Genders. If you do not know what Genders is, its a an API to query a database for a list of hosts that satisfies a gender or tag. If you work with many clustered hosts, you will probably be interested in Genders and its integration to iTerm.

You can find more information on Genders specifically here.

Setting Up Genders

Before you can use Genders, you will need to define a gender database. This is just a text file of nodes and genders. You can also do simple expansion of instances.

For example, /etc/genders (or ~/Library/Preferences/genders) would contain:
web-[01-04] node,web,linux
db-[01-02]  node,db,solaris
app-[01-04] node,app,linux

This concise file defines 10 hosts with six genders. All of these hosts are nodes. Some run linux and others solaris. Each host is also tagged with its function: web, db, or app.


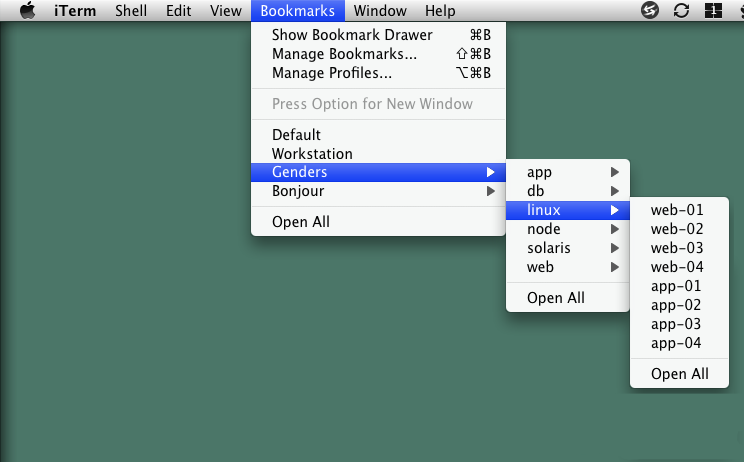
My modification to iTerm uses Genders to create a dynamically generated bookmark list similar to the Bonjour bookmarks. Inside the list, either in the menu or sidebar, you will see a list of genders that contain hosts that match.


In the menu, you can see that all the nodes are sorted by gender. This makes searching and selecting nodes by gender very intuitive. All nodes of a gender can be opened by selecting Open All. Then enable File > Send Input to All Tabs and you can easily manage a dozen of nodes as easily as you can one.

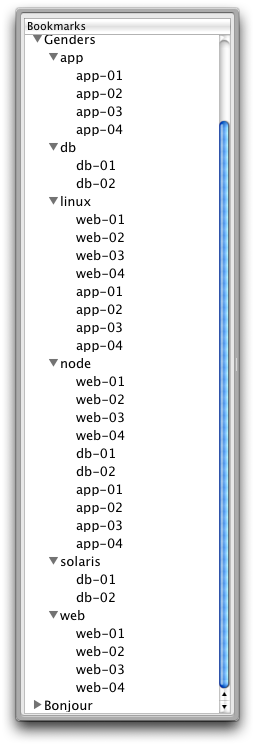
Here is the bookmark side bar fully expanded to show how the nodes are arranged by gender.

All of these bookmarks were generated by parsing the short 3 line genders file.


Customizing iTerm with Genders

Certain genders beginning with “@” act as keywords to iTerm to set bookmark attributes. The special keywords are:

  • @Display
  • @Command
  • @Keyboard
  • @Terminal
  • @Shortcut
These keywords directly correspond to the bookmark attributes and are set when iTerm is launched. Here is what a Genders file will look like, using the special attributes.
web-[01-04] node,web,linux,@Display=web,@Terminal=xterm
db-[01-02]  node,db,solaris,@Display=db,@Terminal=vt100,@Command=telnet
app-[01-04] node,app,linux,@Display=app,@Terminal=xterm
The default @Command is “ssh”.

Notes

  1. Genders returns only the node hostnames and not the domains. If nodes span multiple domains, the domains must be added to the Search Domains in either the System Preferences or /etc/resolv.conf. Needless to say, node hostnames must be unique.
  2. Mac OS X has a limit of eight search domains. If you exceed this limit, you will need to add hosts and IPs to /etc/hosts. You probably wont run into this issue unless you are a very large network. Any more than a few search domains will drastically increase your connection times, so you might want to add your nodes to the /etc/hosts file anyway if you regularly use more than a few domains.
  3. Current implementation of iTerm with Genders does not dynamically reload the genders file if it is changed. iTerm with Genders must be relaunched. I hope to address this when I get a chance.
  4. Errors loading the genders file will be silent. If the Genders bookmark item is missing, there was probably an syntax error in the genders file.
  5. Ignore the Sparkle update notifications or you will overwrite the Genders mod.

Bugs and Comments

Please post any bugs and feature requests pertaining to genders & iTerm in the comments below.

Downloading iTerm with Genders

iTerm with Genders is an informal fork of iTerm 0.9.6. My hope is to get it merged with the official release of iTerm. Until it is merged, here is the Mac OS X Leopard Intel binary and source code. All software iTerm, libgenders, and my DEGengders libgenders cocoa wrapper is distributed under the GNU license.

itermgenders-096 (Mac OS X 10.5 Leopard (x86 Binary)

iTerm with Genders 0.9.6 Source Code

Mac, My Software ,

Access your SVN repository from ANYWHERE with BTMM

December 9th, 2008

If you have Subversion up and running on a Mac on your home network and you have Back-To-My-Mac (BTMM) enabled, you can access your repository from anywhere on your local network or internet.

Use the following URL as your path:

https://computername.membername.members.mac.com/path

  • https is either http or https, depending on how you set up your web server.
  • Computer name is the computer name as set in the Sharing panel of System Preferences.
  • Member name is your dotMac/MobileMe member id. Do not use your email address, just your id.
  • Path is the path of your SVN repository.
Your SVN command will look something like this:
svn co  https://computername.membername.members.mac.com/repo/macosx/MyApp/trunk
You will be prompted for your username and password as usual.

Hints, Mac

DisplayLink and Mac

October 26th, 2008

I wanted to add another external screen to my MacBook Pro and decided to go the DisplayLink route and use the IOGear USB-DVI adapter. The other option was the Matrox DualHead2Go.


The DualHead2Go was attractive because it emulates a double-wide monitor. Two like-resolutioned screens can be used side-by-side with full graphics acceleration. The drawbacks however was

  • price
  • lack of discrete displays thus impeding window management and physical display relationship
  • dialog boxes would appear in the center of both screens
I liked the DisplayLink IOGear USB-DVI adapter solution because
  • The price was very low compared to the DualHead.
  • The OS recognized it as a different display. This allows me to assign on display as the primary by locating the menu bar there.
  • The driver just turned 1.0.
  • Unplugging USB port has the same effect as unplugging a DVI plug. The Mac collects the windows on the primary monitor without any reboot or other interruption.
The compromises I made are
  • The redraw rate is slow, but usable. YouTube videos play ok, but window dragging is choppy. I think this is a combination of no 2d acceleration and USB bus speed. The mouse can be jumpy. The feel is similar to VNC, ScreenRecycler, or Screen Sharing over a network, but a little faster and there is no need to have a spare computer as ScreenRecycler requires.
  • Heavy redrawing (such as playing a you-tube video) will increase CPU usage.
  • Limited color gamut; looks gradients are flattened on photogrpahic images. Text was sharp however.
  • No color matching. The colors are slightly off from the native display.
I chose the DisplayLink and IOGear USB-DVI adapter solution because the work that I do is not very graphics intensive. The second display is used as a utility screen for email, web, Adium, or text editing.
The Mac driver was recently released as 1.0. I hope a near-future update will add better 2-D acceleration.
IOGear is among many vendors that sell external USB-DVI adapters. Some LCD monitors have this capability built in.
Rating: ★★★☆☆

Mac, Review , ,

Wow, WordPress!

October 24th, 2008

I just installed WordPress in about 5 minutes. The website wasn’t kidding when it said it was easy to install. WP looks nice too! I was contemplating ExpressionEngine since I am familar with CodeIgniter (with rocks), but WP is just NICE! I am still learning the interface, but I am loving the AJAX!

Uncategorized